Exchange Migration 2013 to 2016
Getting Set Up
I don’t always do networking things. Canada being 90% small companies you get saddled with projects like this and often don’t have any single area of expertise. One of the first projects in 2019 is to migrate the on prem Exchange server from 2013 to 2019. We have the 2019 image as well but Microsoft is migrating the on prem Exchange to the cloud some time in the 2020s so our next Migration project of 2019 will be cloud based. Plus, we don’t have the user CALs required for Exchange 2019.
It’s my first Exchange migration project and instead of attempting this in production like someone who has the experience may do, I exported a copy of the domain controller and existing mail server VHDXs from the DPM backup repository to inject into an isolated sandboxed test environment on a spare Dell Hyper-V box with 32GB of RAM, an i7-3770K CPU running Windows Server 2016 standard. There is a local 224GB SSD, and two spare drives to host the test domain controller and mail VHDXs equaling about a terabyte of space. Included in the space consumption is the Exchange 2016 box on Server 2016 I built which is going to be about as large as the current mail server once the mailbox databases are migrated over. I keep this whole test environment isolated by putting them on a Hyper-V private switch so they can communicate with each other maintaining their IP addressing and nothing more.
After testing is done in this isolated environment to its fullest, I can attempt moving the new Exchange over to production and taking the necessary steps to make it the primary mail server.
AD and Exchange Preparation
The major things I have considered during this move (in no particular order listed here):
- prepping the new Exchange with the necessities
- prepping AD, the domain, and the schema and verify the forest and domain controller levels
- ensuring DNS records are correct and resolve accordingly. We cannot have two mail servers with the same name so ultimately we will need to cname for the new instance of Exchange
- migrating mail flow
- establishing coexistence with the current Exchange
- migrating public folders if they exist
- creating databases and migrating mailboxes
- specifying database and mailbox quotas consistent with the current Exchange version
- deal with any spam filter or other proxy that may exist in the environment
- verifying inbound and outbound mail flow
- enabling autodiscover, client access and client access namespaces and verfying users are connecting with the proper Exchange server
- re-applying SSL certificate(s)
- decommission Exchange 2013
The fresh Exchange 2016 box requires .Net Framework 4.5.2 or greater, Powershell 4.0 or greater, RSAT-ADDS and RSAT-DNS-Server features installed along with Unified Communications Manager API 4.0. This is easy to do.
After that, we should verify the AD forest and the Domain Controllers with Powershell which we can do from the new Exchange box:
- Get-ADForest
- Get-ADDomainController | Select Name,OperatingSystem
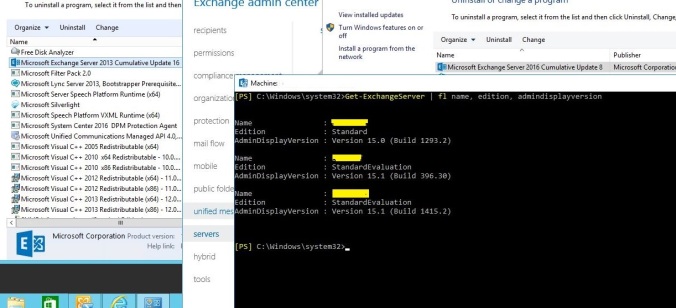
The domain needs to be 2008 or later. DC can run on Server 2016 but at the time of release of Exchange 2016 this was not possible. In 2019, it doesn’t matter now.
Exchange 2013 also needs to have cumulative update 10 or later for the migration. Again, the year is 2019 so this should’ve been applied a long time ago.
After this we can use PowerShell in the directory of the ISO on the Exchange 2016 box to prepare the schema, AD, and the domain for Exchange 2016. The account executing these commands should be part of the enterprise administrator group and schema administrator group – in most cases is probably your domain administrator account.
- Setup /PrepareAD /IAcceptExchangeServerLicenseTerms
- Setup /PrepareSchema /IAcceptExchangeServerLicenseTerms
- Setup /PrepareDomain /IAcceptExchangeServerLicenseTerms
This should complete successfully otherwise the console will throw a ton of errors. In my case the extension of the schema failed because in our environment we have four domain controllers but the test environment only had the one domain controller. I had to go into the controller and kill the AD replication between the other domain controllers. This was accomplished in ‘Users and and Computers’ and simply deleting the domain controllers from there. Then I went to ‘Sites and Services’ and removed the controllers here as well. Lastly, you have to launch ntdsutil from the command line and perform a metadata cleanup by referencing those servers. After this, the AD schema extension completed successfully as any reference of those controllers were wiped from history.
After these preliminary steps you can install Exchange itself:
- Setup /m:install /r:mailbox /IAcceptExchangeServerLicenseTerms /CustomerFeedbackEnabled:False
Here you can specify the location of where the mailboxes and log files should go but I did this later during the mailbox migration. The location of these things should be separate from the drive that holds the OS.
You should be able to log into OWA and ECP via a browser locally and from either the Exchange 2013 box or the DC. The 2016 instance should have both the client access role and mailbox role configured. Alternatively if these somehow did not install properly they can be done so through the command line again using the appropriate switch.
Coexistence
Coexistence being when your domain is running two different Exchange versions. Exchange 2013 and 2016 proxy each other in an up/down fashion so clients should connect with the 2016 version successfully if configured properly.
Importing the SSL Certificate
SSL certs from the 2013 server can be reused on the 2016 server. The cert needs to be exported with the private key via ECP.
Once the certificate is imported on 2016, it needs to be assigned to the appropriate services which can be known by looking at how the certificate is applied on the 2013 server.
In theory, this should be fine. However, given that the servers are on a private switch and have no Internet connectivity, both of the certs read revocation check failures because they cannot talk out with the authority. This should ultimately resolve itself once they have web connectivity.
Relevant Exchange shell commands for this:
- Get-ExchangeCertificate
- Get-ExchangeCertificate -Thumbprint | fl
Auto Discover
Autodiscover uses the FQDN of the mail server.
Exchange installation service connection point defaults to the FQDN as Outlook clients may attempt to connect to this. It will display an SSL error. Trying to read your Outlook mail will generate an error about the cert. Outlook is trying to connect to the wrong URL to retrieve autodiscover information. The error is thrown because the certificate on 2016 is self-signed.
Setting up autodiscover should help avoid this error. Compare with the existing instance on 2013 and apply the change accordingly on 2016.
On the Exchange Shell of the 2016 server:
- Get-ClientAccessServer -Identity ‘name’ | Select Name,AutodiscoverServiceInternalUri | fl
- Set-ClientAccessService -Identity ‘name’ -AutoDiscoverServceInternalUri ‘URL.xml’
In this case the name should be “your current mail server” and the auto discover service URI being https://yourmaildomain.com/autodiscover/autodiscover.xml
Outlook clients should no longer receive SSL related errors opening emails. However, I don’t think there is a “truly verifiable” way of this until the new Exchange is in production.

Client Access Namespaces
Outlook clients connect using HTTPS to Outlook Anywhere, MAPI/HTTP, EWS, autodiscover, and offline address book (OAB). Mobile devices connect to HTTPS with ActiveSync and OWA while administrators connect using ECP.
We would want to configure each HTTPS service with the same namespace as the existing server. This isn’t user impacting and does not hijack user connectivity. Clients will still connect to where the DNS is resolving namespace to.
We can edit the client namespaces through the ECP panel or with Exchange Management Shell. For the get commands, there is a corresponding set command. In fact you can do them one by one or run a script.
Set the names to be the publc FQDN of your mail server:
- $InternalHostname = “mail.yourdomain.com”
- $ExternalHostname = “mail.yourdomain.com”
- $Server = “your new mail server name”
- Get-OutlookAnywhere -Server $Server | Set-OutlookAnywhere `
- -ExternalHostname $ExternalHostname `
- -InternalHostname $InternalHostname `
- -ExternalClientRequireSsl $true `
- -InternalClientRequireSsl $true `
- -DefaultAuthenticationMethod NTLM
- Get-OWAVirtualDirectory -Server $Server | Set-OWAVirtualDirectory `
- -ExternalUrl https://$ExternalHostname/owa `
- -InternalUrl https://$InternalHostname/owa
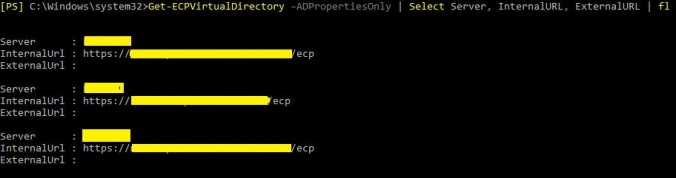
- Get-ECPVirtualDirectory -Server $Server | Set-ECPVirtualDirectory `
- -ExternalUrl https://$ExternalHostname/ecp `
- -InternalUrl https://$InternalHostname/ecp
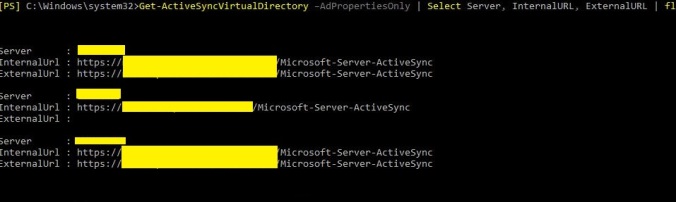
- Get-ActivesyncVirtualDirectory -Server $Server | Set-ActiveSyncVirtualDirectory `
- -ExternalUrl https://$ExternalHostname/Microsoft-Server-ActiveSync `
- -InternalUrl https://$InternalHostname/Microsoft-Server-ActiveSync
- Get-WebServiceVirtualDirectory -Server $Server | Set-WebServicesVirtualDirectory `
- -ExternalUrl https://$ExternalHostname/EWS/Exchange.asmx `
- -InternalUrl https://$InternalHostname/EWS/Exchange.asmx
- Get-OABVirtualDirectory -Server $Server | Set-OABVirtualDirectory `
- -ExternalUrl https://$ExternalHostname/OAB `
- -InternalUrl https://$InternalHostname/OAB
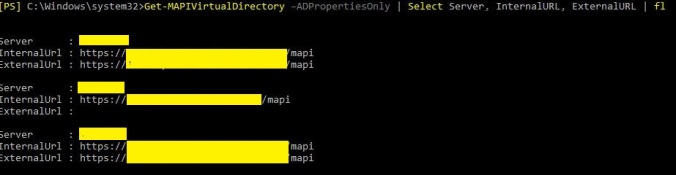
- Get-MapiVirtualDirectory -Server $Server | Set-MapiVirtualDirectory `
- -ExternalUrl https://$ExternalHostname/mapi `
- -InternalUrl https://$InternalHostname/mapi
These virtual directories can be verified with the get commands, or by looking at the virtual directories through ECP. I have the new Exchange server with the same FQDN as the mail server now. So the script took effect.


Migrating Mail Flow
You want to know the mail flow in and out of the organization and how Exchange interacts with a spam filter. We also need to look at the send and receive connector setup. Our considerations are: internal mail flow, inbound mail flow from the Internet and any NAT required, outbound mail flow to the Internet, the use of a spam appliance, and devices or apps that may use SMTP relay.
Send and receive connectors, and SMTP relays
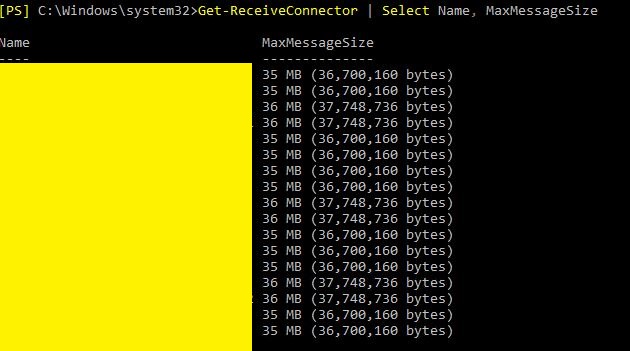
In this case I simply mimicked what already existed on the current Exchange and set up on the new Exchange. A lot of the time with new instances is when test emails are bounced or rejected this is because the sizes between the two connectors are not consistent. The new instance should at least be the same size in the fields:
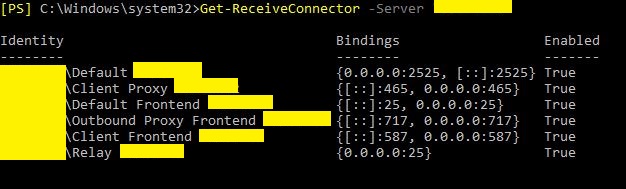
Receive connectors:
- Name: Client Frontend. Role: frontend transport
- Maximum receive message size 35
- Maximum local hop count: 5
- Maximum hop count: 60
- Authentication: TLS, basic authentication offered after starting TLS, and integrated Windows authentication
- Permissions groups: Exchange servers and Exchange users
- Scoping: bound to all available IP4 addresses
- FQDN: newExchangeserver.yourdomain.local
- Name: Client Proxy. Role: hub transport
- Name: Default. Role: hub transport
- Name: Default Frontend. Role: frontend transport
- Name: Outbound Proxy Frontend. Role: frontend transport
- Name: Relay. Role: frontend transport
- Maximum receive message size 35
- Maximum local hop count: 5
- Maximum hop count: 60
- Permissions: Exchange servers, Exchange users, anonymous users
- Remote network settings: various addresses that are using Exchange as SMTP relay
- Scoping: bound to all available IP4 addresses
- FQDN: newExchangeserver.yourdomain.local
The other receive connectors have their own inner specifications but this is just a brief overview.
Send connector:
- Name: Default Send Connector
- Maximum message size (MB): 35
- Use external DNS lookup settings on servers with transport roles
- Address space: SMTP, *, Cost: 1
- Source server: this server, your local server
- FQDN: newExchangeserver.yourdomain.local
There are also relevant PS commands, of course:
- Get-ReceiveConnector | Select Name, MaxMessageSize
- Get-ReceiveConnector –Server ‘new server’ | Set-ReceiveConnector –MaxMessageSize XXMB
- Get-SendConnector | fl
- Get-ReceiveConnector –Server “server name”
- Get-ReceiveConnector “Server”name of connector” | fl
- Get-ReceiveConnector “server name\relay server name” | Add-ADPermission –User ‘NT Authority\Anonymous Logon’ –ExtendedRights MS-Exch-SMTP-Accept-Any-Recipient
- Get-ReceiveConnector –Server “old server name” | Select Identity,Enabled,ProtocolLoggingLevel
- Get-ReceiveConnector –Server “old server name” | Where {$_.ProtocolLoggingLevel –eq “Verbose”}
- Get-ReceiveConnector –Server “old server name” | Where {$_.ProtocolLoggingLevel –eq “Verbose”} | Set-ReceiveConnector –ProtocolLoggingLevel None
- Get-ReceiveConnector –Server “old server name\Relay “old server name”” –ProtocolLoggingLevel Verbose
Spam filters are part of this but this is completely different for each organization.
Creating Databases and Migrating Mailboxes
Our environment has three databases for a total of about 120 mailboxes including shared mailboxes and calendars. We have no public folders.
One database during Exchange installation is set up.
There are a few best practices for databases:
- Separate transaction logs and databases on different storage volumes. Logs on one disk and databases on a different disk. Or in a high availability environment, put the logs and databases on the same volume
- Keep the database and transaction log volume separate from the OS volume
- Multiple smaller databases are better than fewer larger databases when it comes to dealing with repairs and restoration
- Use short database names – easier to command line query, etc
Again, copying the existing Exchange server, I set this up through Exchange shell on the new server:
- Get-MailboxDatabase –Server “server name”
- Rename the default database
Set-MailboxDatabase “name of default database” –Name “new database name” - Location of where the database is stored
Get-MailboxDatabase “new database name” | fl *path* - Move the database and log volumes to the dedicated drive instead of the C:\ where they default to. This needs to be done before migrating any mail boxes because the mailboxes will be dismounted and remounted – they are offline
Move-DatabasePath –Identity “database name” –EdbFilePath “E:\new location for the database.edb” –LogFolderPath “E:\new location to store the logs”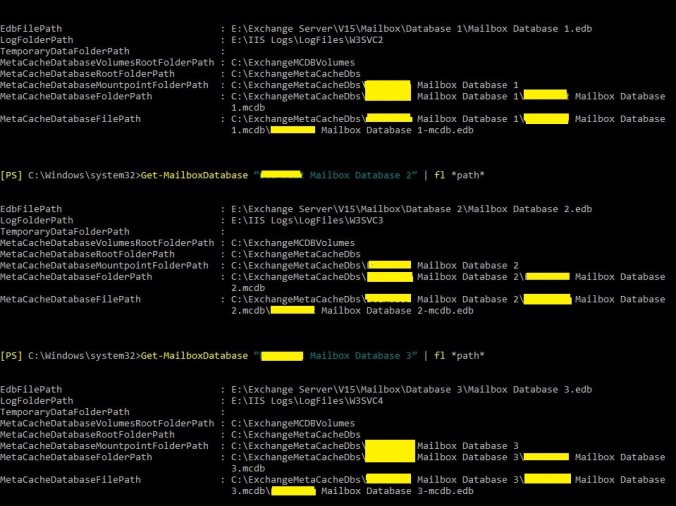
I would keep it identical to how it is setup on the current Exchange.
Then we may proceed with creating the additional databases:
- Doing this will require an Exchange Info Store Service
New-mailboxdatabase –Name “new DB name” –Server bc1mail1 –EDBFilePath “E:\the location where the other databases are” –LogFolderPath “E:\ the location where the other log files are” - Restart the Exchange Store Service
Restart-Service MSExchangeIS - Observe the database status. The new database will not yet be mounted
Get-MailboxDatabase –Status –Server “server name” | select Name,Mounted

- Mount the new database> Due to AD replication time you may not be able to mount a database immediately. Give it 15-30 minutes and try again:
Mount-Database “new database name” - Verify the databases have the appropriate mailbox quotas assigned to them. Any new database should have the same sized quotas as the already existing databases:
Get-MailboxDatabase | Select Name, IssueWarningQuota, ProhibitSendQuota, ProhibitSendReceiveQuota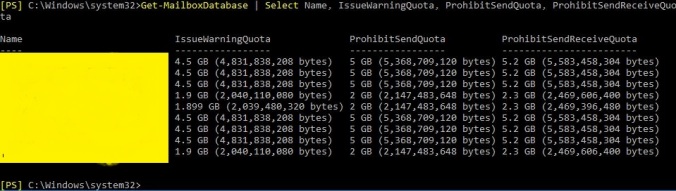
- Specify Quota size for the new databases consistent with those on the existing Exchange server:
Get-MailboxDatabase –Server “2013 server name”| Set-MailboxDatabase –IssueWarningQuota xGB –ProhibitSendQuota xGB –ProhibitSendQuota xGB - Look at the Offline Address Book config for the databases. The default location of the 2013 Exchange address book can be reused for Exchange 2016
Get-MailboxDatabase | Select Name, Offline*
Get-OfflineAddressBook
Get-MailboxDatabase –Server “old server name” | Set-MailboxDatabase –OfflineAddressBook “Default Offline Address Book (Ex2013)”
Once the databases needed have been created and sized accordingly then you can attempt to migrate the mailboxes. Things to note about migration:
- Migrate the arbitration mailbox first (system related mailboxes)
- Migration speed depends on mailbox size and server performance
- Users can use their mailbox up to 95% of the migration process then a brief disconnect occurs
- Migrations generate a ton of transaction logs on the destination mailbox database – 1 GB oflogs per 1 GB mailbox (don’t move more mailbox data than you can have in transaction log space on your destination server)
- Monitor disk space on destination server while this is occurring
- Run regular backups to truncate the transaction logs – logs truncate overnight by default
- There is a mailbox provisioning load balancer that automatically distributes mailboxes across available databases. Auto-provisioning can be disabled or you can manually choose the destination database for each migration batch
From the Exchange management shell on the 2016 server we can do the following:
- Look at the arbitration mailboxes
Get-Mailbox –Arbitration | select name,database
- Move arbitration mailboxes to Exchange 2016. Auto-provisioning on Exchange 2013 should be disabled so Exchange 2016 can automatically select a destination database. Otherwise you need to add more information to this command
Get-Mailbox –Arbitration | New-MoveRequest - To view the move progress
Get-MoveRequest | Get-MoveRequestStatistics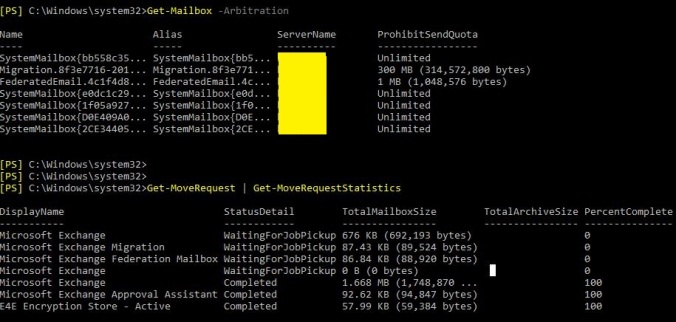
ECP can cover the rest of the migration for user and shared mailboxes. Mailboxes are “evenly” distributed across the databases currently and so I want to move them to the same databases on the 2016 server.
- Select a shared mailbox to move and provide a migration batch name. Move the primary and archive mailboxes simultaneously if they exist. If the auto-provisioning load balancer is set, then it will pick a destination target database. Otherwise you need to provide this location
- Leave the “bad item limit” to 10 – Migration process discards these corrupt items. Bad items are corrupt items generally Outlook calendar related and if a mailbox exceeds 10, it will fail the migration
- Specify yourself for the status report email
- Automatically start the batch. Not harmful to users to start, but users will drop from Exchange briefly near the end of the migration job
- When all of the mailboxes in the batch job are synced, click “complete this migration batch” to finish
From the Exchange shell:
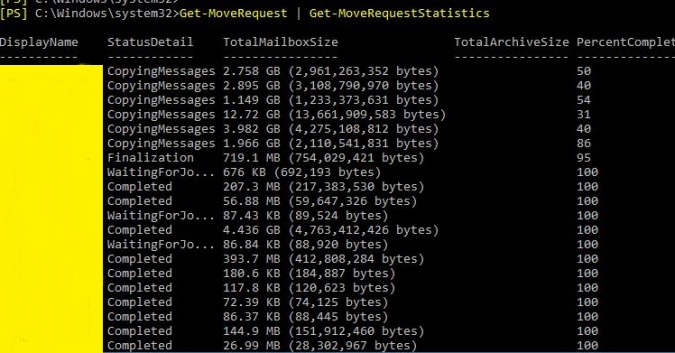
- To view the move progress
Get-MoveRequest | Get-MoveRequestStatistics
If mailbox migration state gets stuck, you may have to turn off Indexing:
- Set-MailboxDatabase “name of database being transferred” -IndexEnabled $false
Testing & Troubleshooting
DNS and Access Testing
Exchange is a beast. A lot of issues encountered will likely require Google searches. But there are some things that can be done right away depending on the issue:
With a test computer you can change the hosts file in System32 to point your mail FQDN to the new mail server. If you can ping it you should also be able to access it via OWA, ECP, and Outlook. This won’t affect other users.
In a sandboxed environment like this you can obviously to right to the DNS and change the A record, associated PTR record, and any other related records that may exist so they reflect the new mail server.
Command Verification and Logs
Unsure whether or not mail can be received? Check the SMTP health status of the receive connectors:

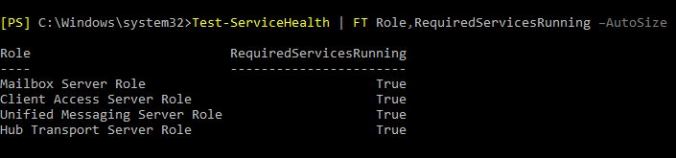
Check the health status of the required roles for Exchange. Make sure they’re running.
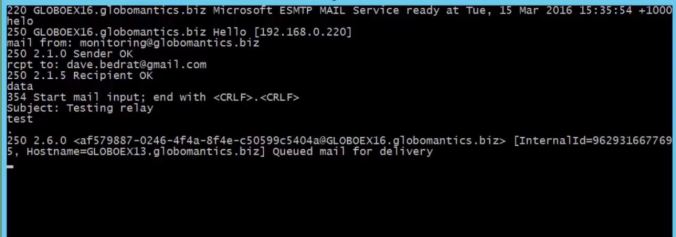
Install Telnet via Server Manager and verify that you can actually send mail to the server and it can receive it properly:
#telnet yournewexchangeserver.yourdomain.com 25
#helo
#mail from: youremail@yourdomain.com
#rcpt to: destinationemail@yourdomain.com
#data
#Subject: Telnet SMTP Mail Test
#does this work?
#.
A code of 220 after the initial telnet command indicates you successfully connected and the server is listening. The mail will be queued for delivery briefly and should be delivered. If mail is delivered, you know the server can be send and received, and that the receive connectors are healthy.
Example,
Of course, if mail can be sent but is not being received despite the following: you may have a queuing issue. This was the biggest problem I had. I spent probably 10 hours trying to figure out what the hell was wrong. After restarting services, the box, testing, reading — nothing. The following tests checked out and I was able to send and receive mail periodically. More often than not my test email would get deposited into the ‘sent’ box but seemingly disappeared into the void and was never received.
After some investigation, I noticed the following things:
- Queue viewer: next hop domain: submission. Delivery type: undefined. Status: Ready. Message count: 3298. My queue viewer is blowing up with messages: from address: <>, Status: retry. Queue ID: <new Exchange Server>\Submission. Message Source Name: DSN. Subject: Delivery delayed: inbound proxy probe. Last error: message deferred by categorizer agent. Recipients: inboundproxy@contoso.com
- E:\Exchange Server\V15\TransportRoles\Logs\Hub\Connectivity\Today’s connect log: I am getting a lot of the same messages: SMTP, shadowredundancy, > , OldExchangeServer.local; SMTP, shadowredundancy, >, Established Connection to 10.1.1.51 (Old Exchange Server); SMTP, shadowredundancy, – , Messages: 1, Bytes: xxxx ()
- This log above looks better than it did Friday. Before it was exploding with DnsConnectorDelivery for our provider and DNS server returned ServerFailure reported by our domain controller.
- Event Viewer MS Exchange is mostly informational and warning: the only consistent error is FIPFS – a FIP-FS Scan process returned error 0x84004003 Msg: scanning process caught exception: Stream ID: big long hex string. Unknown error: failed to meet engine bias critera for filter type (malware).
The question being what does any of this even mean? Messages were being queued for some inexplicable reason but that’s all I knew. And when you try and figure these things out, you learn almost nothing because they’re so cryptic and few people can tell you much about this to begin with. As a last ditch Hail Mary attempt, I restarted the Transport Service: #Restart-Service MSExchangeTransport ….
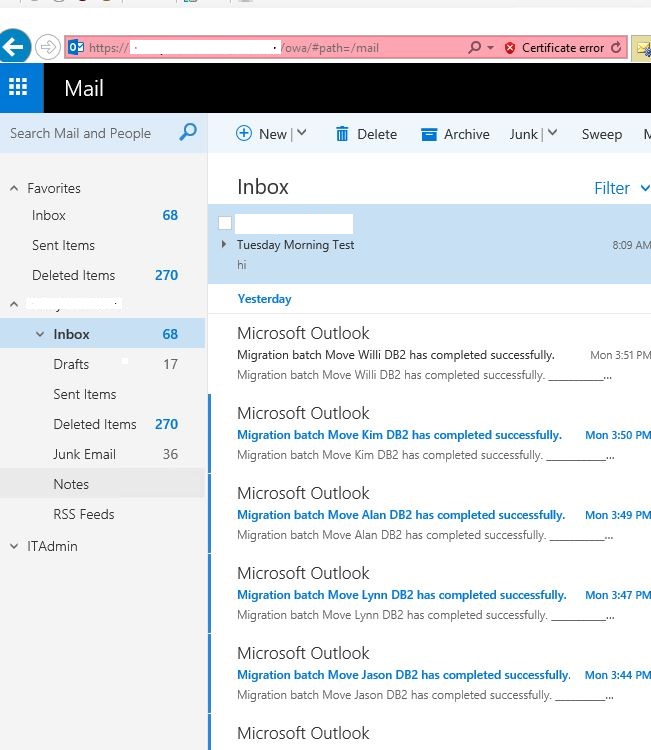
And voila! This did the trick! I have no clue what was wrong with this service other than perhaps it was constantly stuck in some corrupt state upon every system reboot, or something. But once the transport service was manually restarted and functional, my inbox blew up with all of the test messages that were queued over the past couple days. The ‘submission’ queue also dropped down to zero. So for whatever reason it was necessary to manually restart the transport service because the automatic restart due to system boot wasn’t cutting it.
After this, I have been able to send and receive messages without issue: my inbox after restarting the transport service blew up with queued messages.
You don’t have to be an Exchange ‘expert’ in any sense of the word to do this successfully. Mail being so critical and complex though certainly can scare administrators away.